Are you struggling to make your site rank even after producing the best possible content? Well, the fact is no matter how much qualitative content you have produced, any technical issues can dramatically lower your website ranking.
It may be a no-index tag, duplicate content, absence of XML site map, faulty robot.txt file, or the HTTP status code errors, which we often overlook. And by doing this mistake you’re missing the opportunity to get organic traffic.

But don’t need to worry! You can identify all the issues of your site with the perfect technical SEO audit.
In the following discussion, I have put together the top 15 technical SEO elements to check for maximum site optimization. Let’s drive into them!
The 15 Most Important Checklist of a Technical SEO Audit
The technical SEO audit is the process of checking the technical aspect of your website’s SEO. Basically, it analyses the health of a website and finds out what might be needed to improve.
With the help of technical SEO, you can ensure a strong foundation. Which results in boosting the ranking, improving conversation rates, generating leads, sales, and leads to maximize the ROI.
So, let’s find out all the checklists that you must consider while auditing your site for technical SEO.
1. Run an Audit and Fix Issues
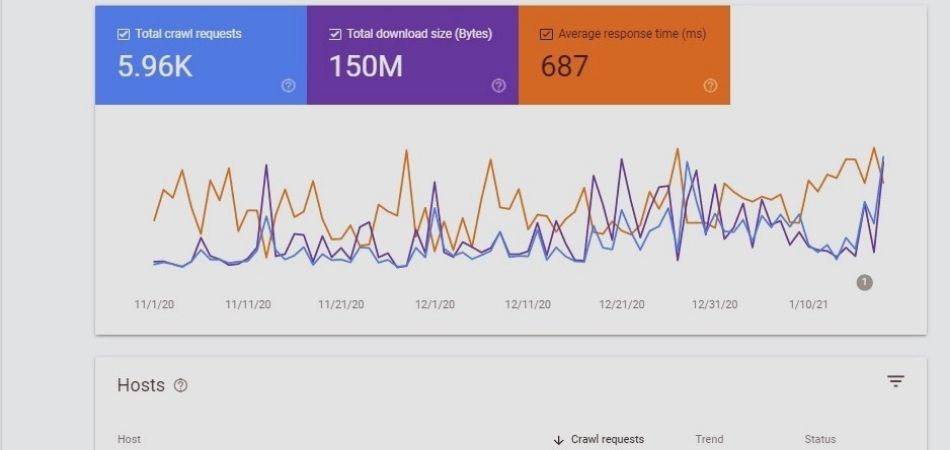
One of the first things of a technical SEO audit is to run a crawl report. To fix all the site errors and warnings, it’s essential and should be consistent. Also, it is crucial when it comes to making sure top ranking on the SERP for longer. It involves looking at all the elements, pages, and content on your website. It provides insight into your site’s errors where you might see the most pressing issues like:
- Duplicate content
- Low page speed
- Missing H1/H2 tags
- Excess redirects
- Unlinked pages
- Broken links
But, how to run a crawl report?
You can do this audit with Google Search Console. If you haven’t created an account yet, do it right now. Also, you can use a variety of free SEO audit tools. It would be best if you did this every month to ensure your site is optimized and free of errors. So, here are the other tools-
- Google PageSpeed Insights
- GTMetrix
- Pingdom
- Screaming Frog
- SEMrush Site Audit
- Ahrefs Site Audit
- Alexa’s Site Audit Tool
- SEOptimer SEO Audit & Reporting Tool
SEO is an ongoing process and things keep changing frequently, therefore, you can’t avoid or ignore auditing your site. This will help you to run an in-depth analysis of your website and discover all the errors.
Throughout this guide, I’ll discuss all the major technical SEO errors and fixing processes, that you can figure out from the SEO audit.
2. Application of SSL
Data transfer over HTTP is not encrypted anymore, as third-party attackers can easily steal your information. The one and only solution for this is to migrate or move your site to HTTPS. HTTPS uses a secure certificate to ensure your site is legitimate by creating a secure connection.
The SSL term stands for Secure Socket Layer. It is used to ensure the secured credit card transfer, data transfer, and sign-in information. When the users enter the information into your site, the SSL certificate ensures all data between the browser and web server will remain private.
Apart from that, while shopping online users always prefer sites with the HTTPS padlock. It ensures that all the provided information of the users is encrypted. Which results in boosting the customer’s trust and helps your site to rank top in the SERPs.

Side by side, being secured is better for both the SEO and the users. Google now considers the SSL certificate as a part of the search ranking algorithm so that the proper implementation can rank you higher on results pages.
How to fix it?
The first task is determining what type of SSL certificate you need. If you run a more regulated industry like finance, you may need to meet specific requirements. After determining the type of certificate, you can purchase it from SSl.com, DigiCert, GlobalSign, or others. You will get the SSL certificate free of cost if your website is hosted on HubSpot or WordPress.
3. Check For Redirect Errors
The search engines and users won’t access your site if you are using the HTTP URLs. Rather than your content, they will get 3xx, 4xx, and 5xx status codes. So you need to check the status codes, and if it is still HTTP URLs, switch it to HTTPS.
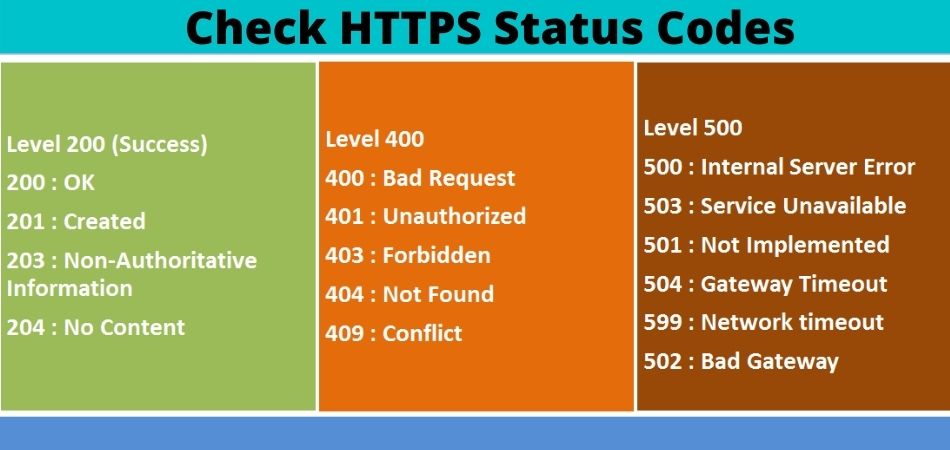
After that, you should focus on other status code errors. You will get a list of URL errors in your crawl report, including 404 errors. However, you could also get a more detailed report from Google Search Console, which included a breakdown of the potential issues.
You should try to fix the issues as soon as possible they arise and ensure that the list is always empty.
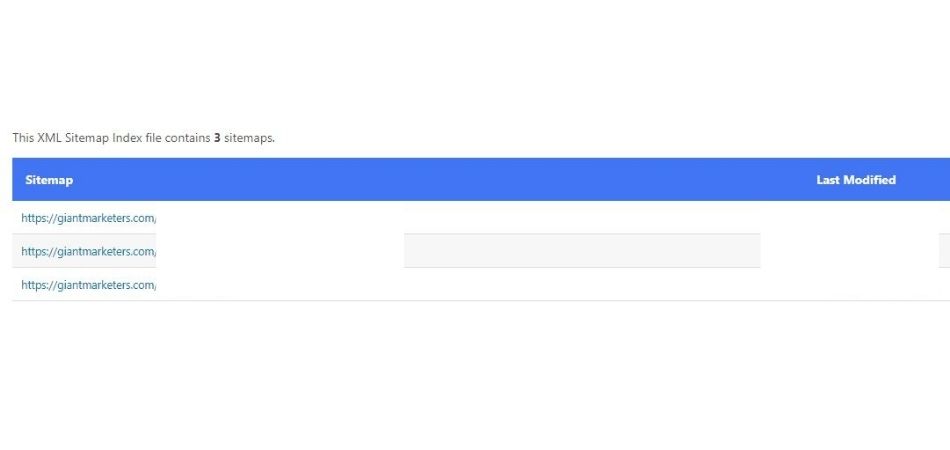
4. Examine XML Sitemap Status
The XML sitemap works as a roadmap for Google and other search engine crawlers. It provides the info of your website’s structure and helps them to discover new pages, thus ranking them accordingly.
If you already submitted the XML sitemap on your website, make sure that it meets the key guidelines :
- Your sitemap is free from any errors.
- It is appropriately formatted.
- It is short and contains all the important pages.
- It follows the XML sitemap protocol.
- All your latest blog posts or articles are included in it.
- Submitted to your Google Search Console.
If you don’t have an XML sitemap, you can create it within a few minutes. If your site runs on WordPress, you should install a plugin called Yoast or use Google XML Sitemaps to create your site’s XML sitemaps. Or, if you don’t use WordPress, you can use Screaming Frog to create your XML sitemap.
How to Submit the Sitemap to Google?
Once you have done with the sitemap creation, you should move to submit it. You have to make this submission through Google Search Console Sitemaps tools. Here you just input your sitemap URL and click on the ‘Submit’ button.
Besides, you can also insert it through the robots.txt file.

At the time of submitting the sitemap, ensure that it is pristine with all the URLs returning 200 status codes and proper canonicals. It saves your time and money; otherwise, it would be wasted on crawling broken and duplicate pages.
5. Check Site’s Robots.txt File
It is a series of commands or an instruction manual that helps web crawlers to crawl and display pages for relevant searches. Apart from that, this file instructs search engines where they can crawl and where can’t.
If it is noticed that all of your pages are not indexed, you should look at your robot.txt file. You can simply see this file by adding the “robots.txt” to the end of your domain. For example, giantmarketers.com/robots.txt.

Now, it’s time to examine your robots.txt file; here, you will look for the phrase ‘Disallow:/’.
This element signals to the search engine not to crawl the specific page or even the entire site. It’s a common occurrence for the updated content/articles or the pages. Ensure that your robot.txt file is accidentally disallowing none of the relevant pages or any elements.
Now, if any of your relevant pages are being disallowed by robots.txt mistakenly, these are the things that you should do.
- Use a robots.txt generator tool, for example, SEOptimer. It will help you to avoid any syntax errors. You should set the robots.txt accurately as a single syntax error can deindex your entire site.
- Then upload the file to the websites’ root directory once it gets done.
- You can use FileZilla to place the file.
- After that, test the robots.txt and ensure it is working correctly. The robots.txt Tester can help you in this process.
Best Practices of robots.txt
- It is a matter of sensitivity, therefore, you should ensure the file name is exactly like this “robots.txt,” not like “TXT, ROBOTS.TXT, Robots.Txt,” etc.
- Make sure to place the robots.txt file in the main directory, not in the subdirectory of your site. Otherwise, you won’t find it again.
- Use two wildcards in the robots.txt file, and these are
- (*): Address all User-Agents.
- ($): Indicates the end of a URL.
- For every subdomain, you should create a separate robots.txt file.
6. Schema Markup
In technical SEO another worthy thing is structured data which is also known as schema markup. Google uses data snippets and structured data that appear in your pages’ HTML code. It helps search engines to provide rich snippets about your page.
With schema markup, your ratings won’t be improved but it will help you to gain more CTR.
So, how do you implement schema markup? Well, it can be a tricky job when you try to do it manually. But, with the help of schema generator tools, this process will become much easier. So, let’s have a look at the tools-
- Hall Analysis schema markup generator
- Google Structured Data Markup Helper
- Microdata Generator.com
- Merkle Schema Markup Generator
Also, WordPress users can install the Yoast plugin, and it will add structured data for you.
7. Monitor Website Load Time
The website load time is another technical SEO metric that affects the user experience as well as lowers your page rankings. 50% of visitors will abandon a site if it takes more than 3 seconds to load. About 46% of users don’t revisit poorly performing websites and a one-second delay reduces customer satisfaction by 16%.

You can find your site’s load speed by using the PageSpeed Insights tool of Google. You just input the site’s URL, Google will do the rest. This tool will show the site load time metrics, both desktop and for mobile, especially with a mobile-first indexing system.
It is better to keep your page load time within 3 seconds. So start optimizing your site’s elements by-
- Compressing images,
- Minifying CSS, HTML, Nad JavaScript,
- Using Browser Caching,
- Getting a CDN,
- Reducing Redirects,
- Delete unnecessary plugins,
- Reducing server response time.
8. Ensure Mobile-Friendliness Site
The number of mobile users is increasing dramatically. About 60% of all online searches have now come from mobile devices. And through the algorithm update in 2015, Google is following the mobile-first indexing strategy.
This implies Google gives more preferences to mobile-friendly websites. For that reason, mobile-friendliness is now the top preference for technical SEO audits.

There are some tools that can assist you in getting insights into the mobile state of your website. For example,
- Google’s Mobile-Friendly Test
- HubSpot’s Website Grader
- Bing’s Mobile Friendliness Test Tool
- GTMetrix
Once done with the test, follow the best practices to make your site mobile-friendly.
- Make sure to integrate responsive web design
- Ensure bigger font size
- Compress images
- Accelerated Mobile Pages(AMP)
- Avoid using pop-ups and flash
- Create a separate mobile URL.
9. Optimizing Images
The larger the image file the more it will affect your site load speed because it takes more time to load. The slow loading pages discourage users from exploring what you have to offer on your site.

How to optimize the issues?
- Use Smart Resize, Image Resizer Tool, etc to scale the images with the correct size.
- For WordPress, you can use WPSmush to reduce the image size. Other than that, you can use TinyPNG or kraken.io.
- Give the name of the images descriptively and in plain language.
- Optimize the alt attributes carefully.
- Select the dimension of your images.
- Reduce the image file size
- Select the right file type(JPEG, PNG, GIF)
- Optimize your thumbnails.
There’s more to image optimization, which leads to the next section.
10. Image ALT Tags
If you can’t use alt tags in your page images, Google can’t see and understand what’s the motive of using a specific image. Therefore, it’s crucial to name all your images with a descriptive file name. Unfortunately, this is one of the SEO factors that are often neglected or avoided by site owners.
It’s a best practice to use alt tags for all the images of each page of your site. This will describe the content properly to Google so that it can determine what your image tries to imply.
So, how can you use alt tags for your images?
Usually, Alt tags are used within the HTML code, and their job is to describe the functions and appearance of images on pages. Like the following-
<img src=”kwe.png” alt=”Moz Keyword Explorer tool for SEO keyword research”>
Best Practices for Writing A Good ALT Text
- Include the target keyword only in your main image’s alt tag. But make sure not to stuff with keywords.
- For the rest of the images, you can simply use a short but descriptive sentence. This will make it understandable for the search engines.
- Describe the image as specifically as possible.
- Never use images as text.
- Avoid including “image of” and “picture of” in your alt tags.
11. Run a Keyword Cannibalization Audit
Keyword cannibalization indicates that you have several content or articles within your website that can rank for the same search query. It could happen when the topic they cover is too similar or you optimized them for the same keyphrase.

This method puts the search engines into confusion because they have to figure out which page is better than others. The Performance report of Google Search Console can help you find the pages that are competing with the same keywords.
You can also use Semrush to see which pages contain a similar phrase in their URLs. Another traditional way is to search by keyword like site:yoursitename.com “your keyword” to see how many pages are ranking for the same keywords. Then you can use canonical URLs to avoid This leads us to the next point.
12. Checking for Canonical URLs
The canonical URL is a technical solution for duplicate content. On your website, you have written an article that is attached to two categories and exists under two URLs.
For example, these URLs are:
- https://sportshoe.com/black-shoes/black-and-red-shoes/
- https://sportshoe.com/red-shoes/black-and-red-shoes/
Since both URLs refer to the same post so you can use the canonical URL to tell the search engines which one to show on the search results.
How do you fix it?
The simplest and most obvious way is using a rel=canonical tag to specify a canonical URL. find out the duplicate page and add the rel=canonical tag like this-
<link rel=“canonical” href=“https://yourdomain.com/tshirts/gray-tshirts/” />
On the other side, if you don’t want to mess with the codes you can simply install the Yoast SEO plugin. And it will do the rest for you.
According to Google, you should list the canonical URLs on your site map also. Here, you can implement two more options like using 301 redirects and internal linking which is known as canonicalization signal.
13. Check For Optimizing Internal Linking
Internal links are hyperlinks from one page that point to the same domain’s other pages. It connects pages on the same domain but unfortunately, it is one of the most underrated strategies. Without internal linking, Google finds it really difficult to index your pages. In fact, a poor internal link structure highly impacts your website’s search visibility.
Here are why internal linking is necessary for your site-
- Improves easy navigation to other pages of your site.
- Establish a proper hierarchy of information.
- Spreads link juice or ranking power around your website.
- Encourage users to spend more time which results in decreasing bounce rates.
- Increase page view of your site.
Best Practices of Internal Linking
- Use Descriptive Keyword-Rich Anchor Text
- Use Dofollow and Natural Links
- Link pages that don’t have redirects.
- Ensure linking to high-priority pages
- Focus on natural internal linking for the readers.
- Ensure providing relevant and helpful information and avoid linking unnecessary or random pages.
- Link Deep Within Your Site Structure
14. Find out the Broken Links
Broken links don’t work at all and they are really bad for SEO. Some of the causes behind these problems are: The webpage was moved without a redirect being added, URL structure was changed, linking to the content(PDFs, videos, images, or infographic) that has been moved.

The broken links can waste your budget, lead to a bad users experience, and lower your site rankings on SERPs. So, finding these links and fixing them is crucial for your website.
How to Find and Fix Broken Links?
Here you need to go through some steps:
Step 1: Finding all broken links
You can complete the process through the DrLinkCheck.com tool or if you’re using WordPress, simply install the Broken Link Checker Plugin.
Step 2: Fixing the Broken Links
There are two possible fixes:
● Replace them with live links: Find the links that would be the perfect replacement for broken links, and then replace them on the website.
● Remove the links: If you think that the replacement process won’t be much beneficial and time-consuming, locate the broken links and remove them.
Step 4: Fixing the Backlinks
Though there is no control over the external links or backlinks. However, you can contact the linking website owner and request a fix. And then, look out if you forget to redirect while changing the URL or not. Another way is, find similar content on your site and redirect the broken link with that page.
15. Optimize URL Structure
Technical SEO helps in optimizing the usability or discoverability of your website. And, when it comes to discoverability, optimizing URL structure is a must. Therefore, technical SEO includes optimizing your site’s URL structure.
Let me clear it with an example,
- http://www.yourdomain.com/content.php?pid=169783546&sid=10175967/2009/04/15
- http://www.yourdomain.com/blog/social-media/how-to-promote-your-tweets/
Now, tell me, as a reader, which URL will you prefer to click through? Probably, the second one, right?
The reason is very clear, as users can’t really guess the content topic of the unclear first URL. In contrast, the second example is able to imply the content clearly, and readers also get an idea about what they will get from the page.
So, while creating URLs, ensure keeping the humans in your mind. So, let’s see the factors that you can consider while creating SEO-Friendly URLs.
- Always include the target keyword in the URLs. Optimize your header, meta description, and title tags with target keywords. Also, do the same with the URLs.
- Keep the URLs short as it is easier to index than longer ones. Try to keep the URLs in between 5 words. Still, if you have to go more, instead of chopping the entire phrase, you can eliminate the extra words like “the,” “and,” etc.
- Use separators like dash to separate each word. This makes the URLs more readable and less likely to be misread by both the search engines and readers.
- Write the URL in lowercase letters.
Conclusion
You will have to check a number of technical SEO elements during your next SEO audit. Being proactive about these elements. Don’t carry the tendency of considering a few of them and ignore the rest.
Overlooking the technical SEO factors will highly impact your site’s loading speed, indexing, user experience, and many more. So, from the crawl report to broken links, every technical aspect should be considered to make a perfect audit.
Once you understand the basics, a technical SEO audit will be easy to do. Hopefully, you are well informed about the elements that need to be checked during the audit. Now it’s time to make your own audit!
And, if you are looking forward to optimizing your site foundation, Giant Marketer’s is there for you. You can Contact Us for details.